Configure Microsoft Entra outbound User provisioning for Diggle’s supported SCIM subset.
Before you start
You need Diggle workspace administrator access, an Entra administrator who can manage application provisioning, the Entra tenant ID, and one dedicated assigned test user with a consistent work identifier. Confirm the required Entra licensing with your tenant administrator.
Connect the application
Ask Diggle to enable SCIM for the workspace, then create a provisioning token in
Manage Workspace → Integrations. Select Microsoft Entra and enter the Entra tenant
ID as a GUID, not an onmicrosoft.com domain.
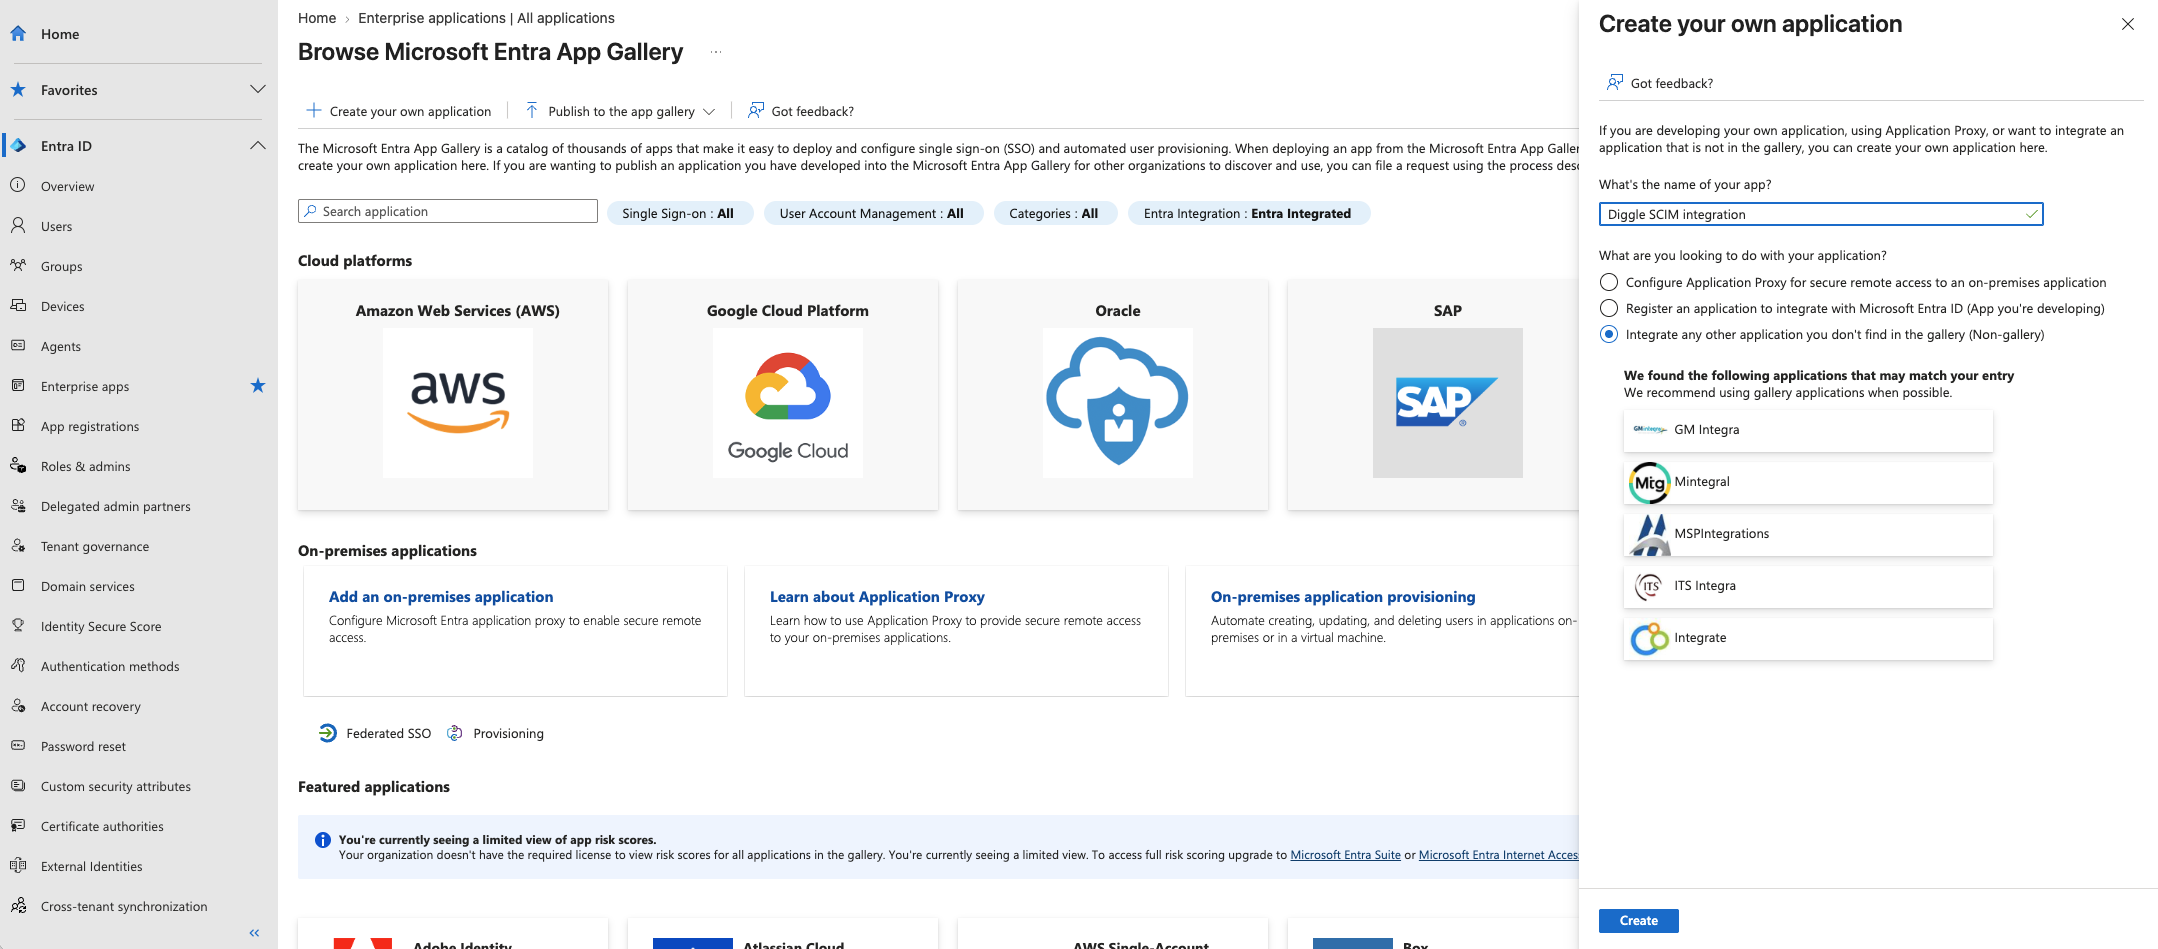
In Microsoft Entra, create a new Enterprise Application and select
Integrate any other application you don’t find in the gallery (Non-gallery).
Enter a descriptive name, for example Diggle SCIM integration.
The application name is only a label in Entra and can be chosen freely.
Create a non-gallery Enterprise Application for Diggle SCIM provisioning.
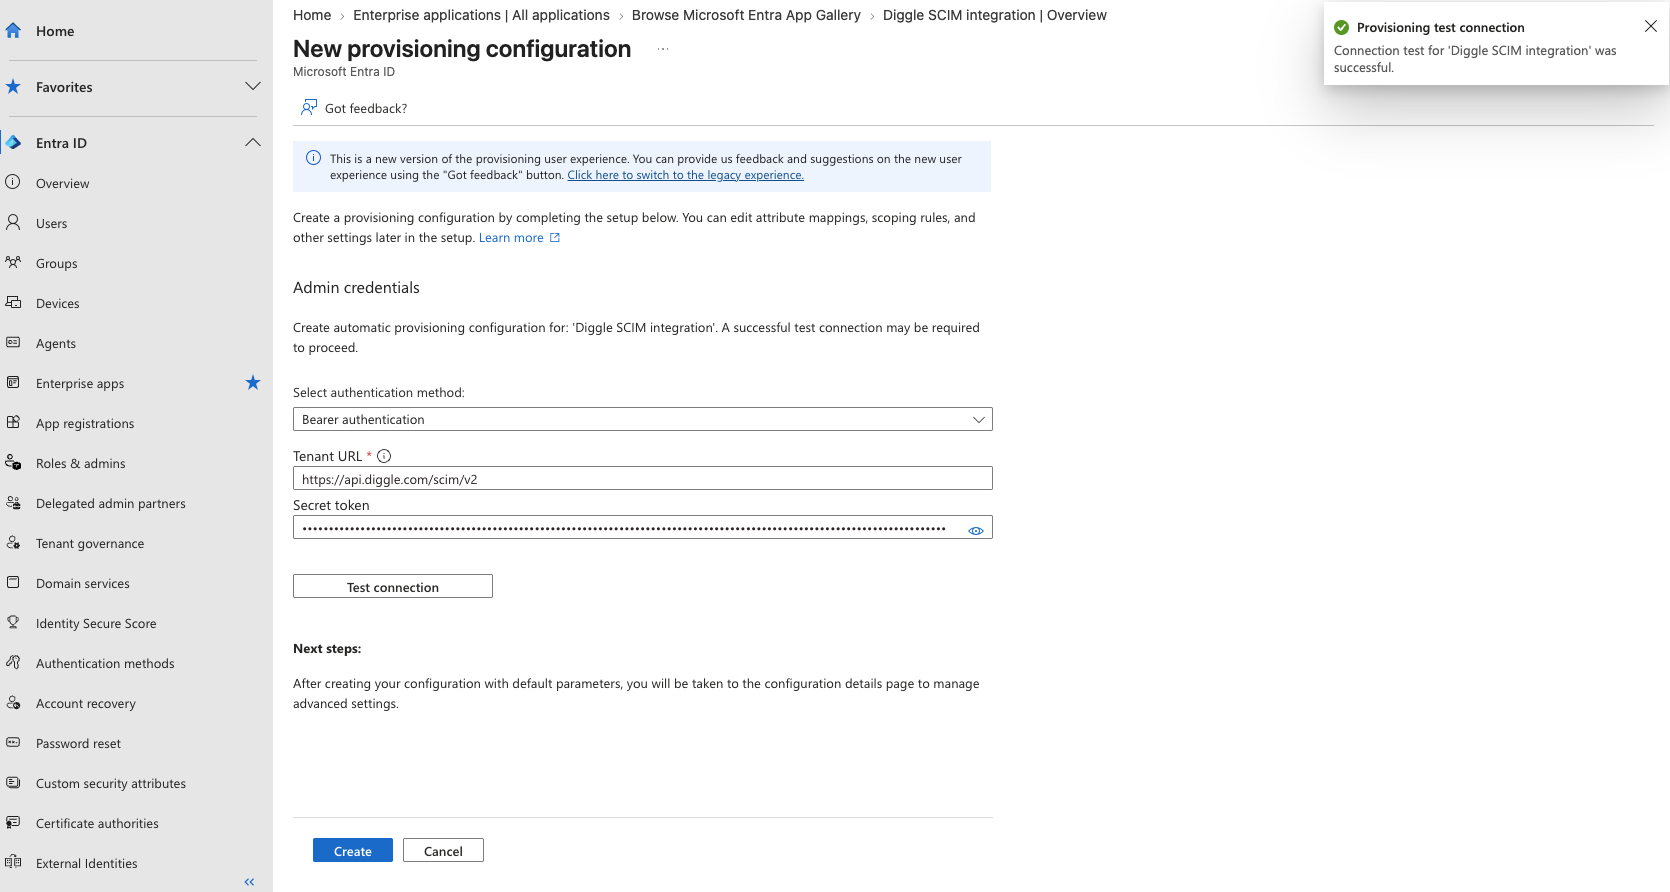
Enter the copied Diggle SCIM base endpoint as Tenant URL
(production: https://api.diggle.com/scim/v2), without
/Users. Enter the raw provisioning token as Secret Token,
without a Bearer prefix; Entra supplies the Bearer authorization header.
Select Test Connection. Save only after the connection succeeds.
Enter the Diggle SCIM endpoint and provisioning token, then select Test connection to verify the connection.
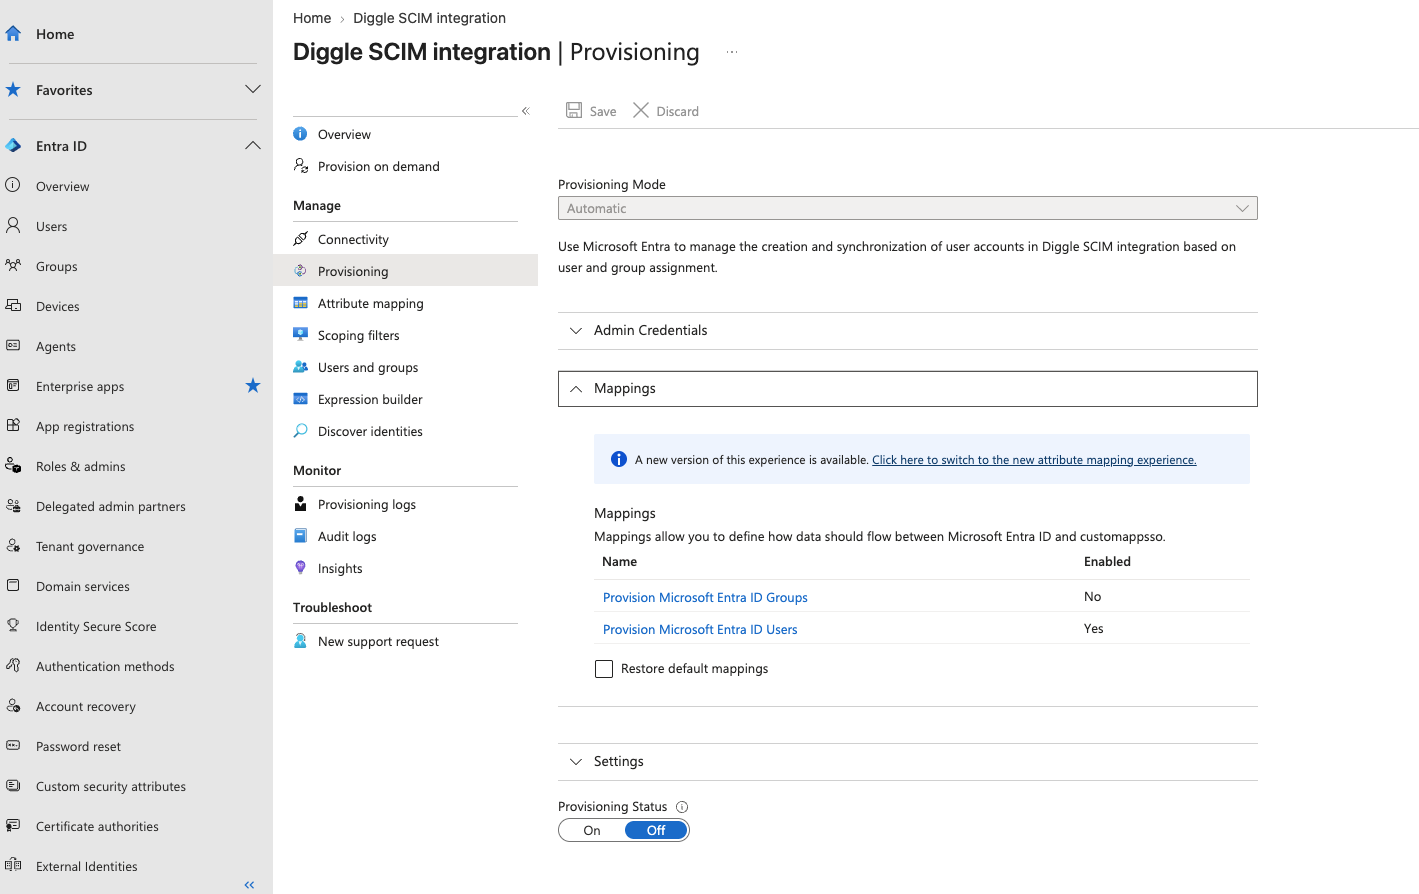
Configure User mappings below. Scope provisioning to the intended assigned users.
Entra-side group assignment can define that scope; disable synchronization of
Group objects to Diggle.
Enable User provisioning and disable SCIM Group provisioning.
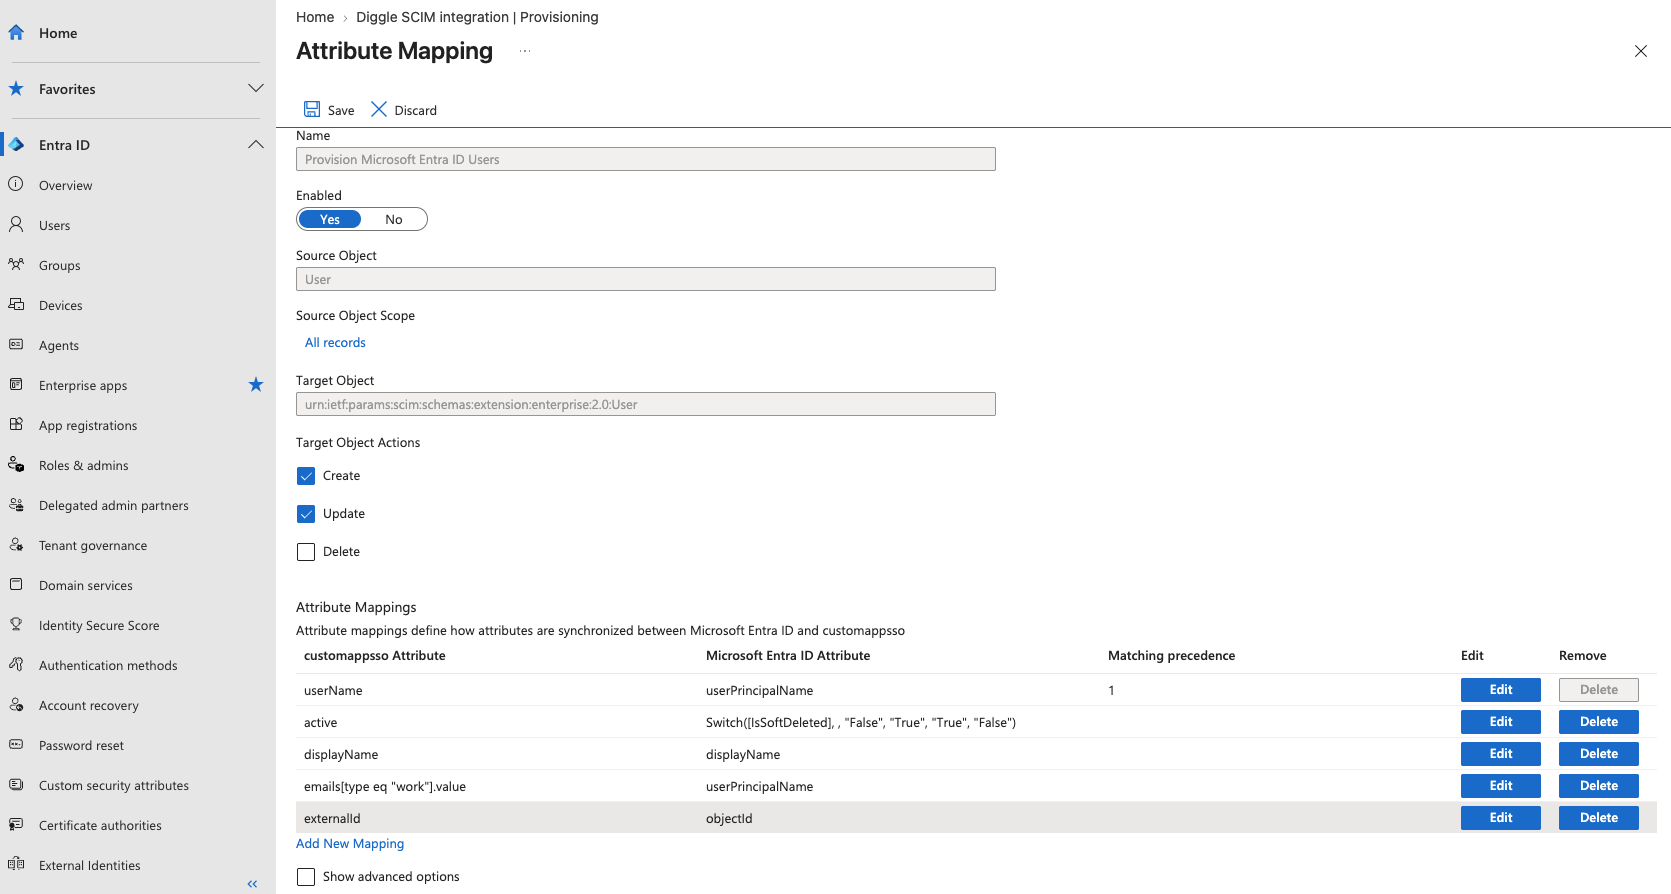
Do not independently map differing UPN and mail values to userName and work email. When both are sent, they must identify the same normalized email. Remove unsupported name components, company/HR fields, multiple emails, email labels, projectIds and reprovision mappings.
The five mappings above (excluding the optional role) are the tested baseline for Diggle User provisioning. A successful Provision on demand validates the connection and user creation path, but it does not by itself validate every lifecycle and offboarding scenario. displayName updates the SCIM source profile, not the existing global account name. Keep standard SCIM schemas; remove unsupported attribute mappings rather than removing the schemas field.
Configure attribute mappings
Open Entra ID → Enterprise apps → your application → Provisioning → Attribute Mapping and select the User mappings. Older portal layouts show this under Mappings.
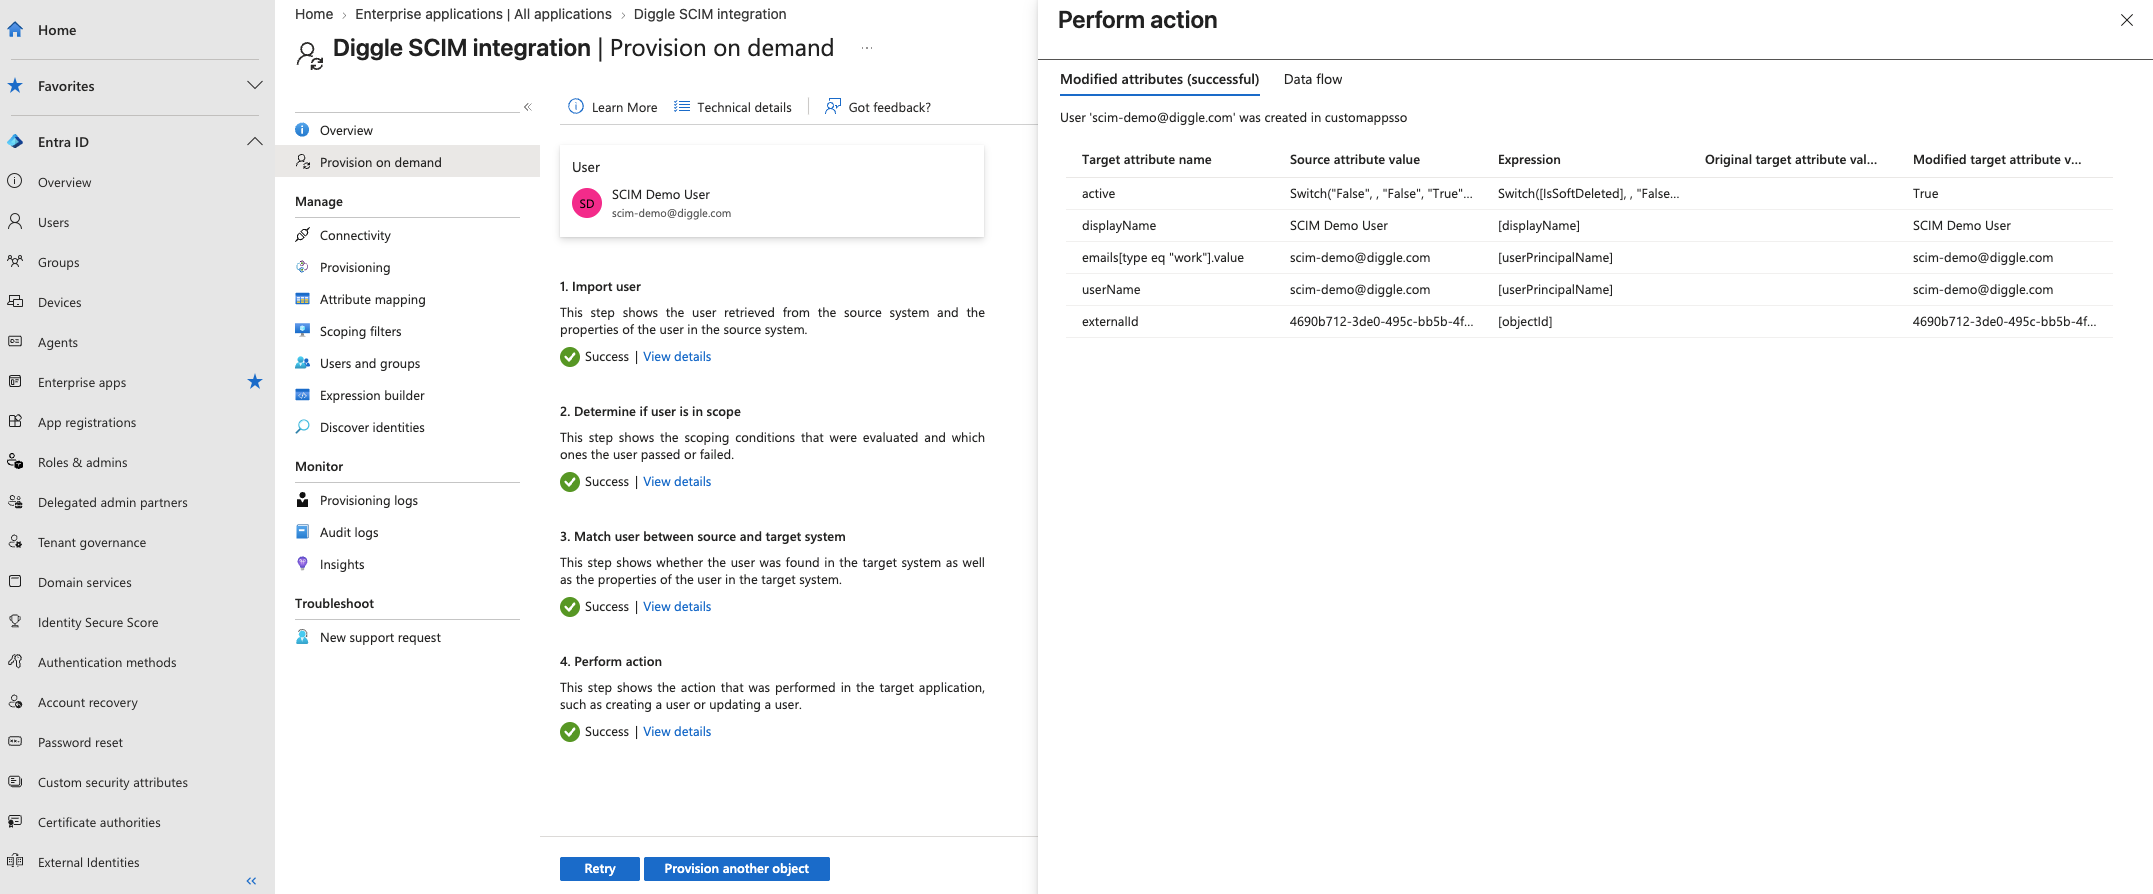
Map userPrincipalName to userName. Set Match objects using this attribute to Yes and set Matching precedence to 1.
Map the same userPrincipalName value to emails[type eq "work"].value. Map objectId directly to externalId. In this documented setup, externalId is stored as the stable Entra source identifier; it is not the Entra matching attribute. Do not map objectId to the SCIM id.
Map displayName directly. Apply profile and lifecycle mappings on both creation and updates.
Keep active as a Boolean target and use the lifecycle expression below. Do not replace it with a constant true.
Configure the Diggle User mappings with Create and Update enabled, and leave Delete disabled.
The expression reverses IsSoftDeleted into active. Microsoft documents IsSoftDeleted for unassignment, scoping-filter exclusion, soft deletion and AccountEnabled=false. Keep the target type Boolean. This is a configuration starting point, not evidence that every offboarding scenario has been tested in your tenant. Test each relevant event before rollout.
Optional workspace role
In User mappings, open Advanced Options → Edit target User attributes (older layouts: Show advanced options → Edit attribute list).
Add the following attribute as a single-valued, optional String. It is not a primary key or matching attribute.
Save the attribute list, then add a mapping to this target. If all assigned users should have Run only access, use a Constant value of runner. Otherwise map an approved source value that returns exactly admin, creator or runner. A constant applies to every user in scope and can change existing roles. Omit the mapping if Diggle should retain existing roles and use runner for new users.
See Microsoft’s attribute mapping instructions for the current portal controls and schema editor.
Deprovisioning configuration
Keep Create and Update target object actions enabled. Disable the Delete target object action because Diggle rejects terminal SCIM DELETE. Keep the active lifecycle mapping and do not enable skip-out-of-scope deletions; unassignment must still send a disable update.
Note: Before permanently purging a directory user, confirm that Diggle received active=false or explicitly revoke the user’s workspace access in Diggle. If a user is purged before a disable update arrives, Delete-disabled configuration can leave access active.
Start and monitor provisioning
Assign a small test scope under Users and groups. Set provisioning scope to assigned users and groups only, keep Group object synchronization disabled, and start provisioning. Use Provision on demand for a test user where available. Inspect Provisioning logs for the operation, status and error details, then verify access in Diggle. Test Connection alone does not validate mappings or offboarding.
Provision one test user on demand and verify that all provisioning steps complete successfully.
Validate before expanding scope
Create one assigned test user; verify the expected role.
Update displayName and the approved email aliases. Confirm that the global Diggle login profile is not silently replaced.
Unassign or deactivate the user and verify active=false and loss of workspace access.
Reassign/reactivate and verify permitted membership restoration without historical private project grants.
Test the local Diggle revoke case: later active=true must remain blocked until deliberate admin unblock.
Verify group unassignment, soft deletion and permanent deletion behavior with the chosen target actions.